Leave a comment

New Year Nails

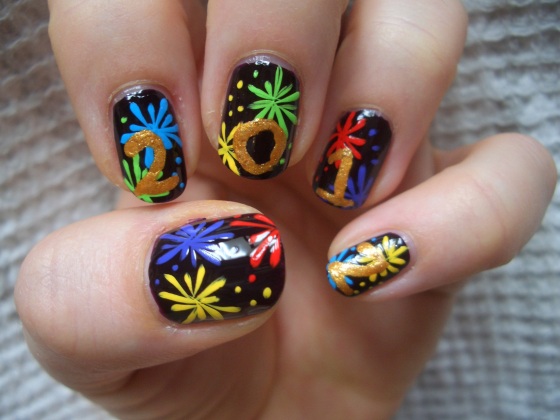
Happy Happy !!!  Better late than never so, here they are.   Big oops, I did the white nails on my right hand as you can see…..ya so, I guess doing them up side down wasn’t the greatest idea.  Well, that’s what this blog is all about learning and teaching.  I sure taught myself that’s for sure.

I got these great nail ideas from : simplyrins and chalkboardnails both of these ladies have amazing sites so, check them out and be a fan as well.

Here, I took simplyrins fireworks and added on top Orly Glitz for our New Year 2012.  The base is OPI Lincoln Park After Dark with acrylic paint, red, yellow, green, blue and purple.

For my right hand I used chalkboard birthday nails for the idea of ribbons or streamers ( confetti even ) another type of New Year nails.  This time, I used, OPI Alpine Snow for the base and the same Acrylic paints using the darker shade for highlights on the streamers/ribbons.  Adding on top Orly Dazzle for 2102. Pretty big mistake, I know.  To make it even more funny for you guys I didn’t even clue in until well after the top coats have dried.  Yup loser !!

Have a wonderful New Year everyone !!!

Leave a comment

Holly Nails

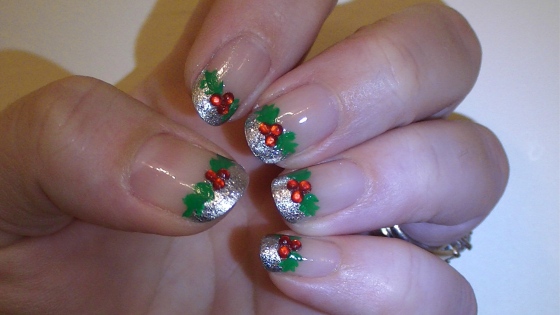
One week before christmas and this one is Holly Nails.  I really like this look and it is the easiest nails I have done so far.  As even painting the silver tips don’t have to be so straight as once you paint on the green leaves and berries you can’t see any mistakes you might have made.  Here is the list of products I used and the inspiration on the idea I got it from.  ENJOY ! 

Orly – Dazzle ( silver tips )

Sally Girl – Silver glitter ( one coat on top of the silver polish )

Rhinestones – Red (three of them)

Acrylic Paint – Bright Green

Opi – Top Coat and Base Coat. ( after the rhinestone another coat to seal the stones in place)

If you don’t have the rhinestones using red polish with or without sparkle or even red acrylic paint all works and still is amazing with the silver.  Check out creativenailart  she’s very creative !!

Leave a comment

Santa Nails

Santa Nails, can’t do Christmas Nails without the big guy.  So, here are my nails that I recreated from theblondieprincess she has some great ideas so check her site out as well.  I think, I did these Santa nails too early as I should have done them on the big day.  Oh, well I might try them again so easy to do.  And easy enough for the non-dominant hand.  Here are the products I used.

China Glaze – White On White

China Glaze – Hey Sailor

Nail Art Striper – Black

Nail Art Pen – Gold Sparkle

Revlon Color stay – Passion Pink

Acrylic Paint – Peach

I started out painting all my nails in white leaving my thumb nails for last.  I used red to make the Santa suit and made wavy lines on each side of my nail leaving enough of the white to show through.  Next up, was the black striper take your time to make the Santa belt straight and evenly matching from top to bottom.  Last part was the Gold glitter/sparkle for the belt buckle.  Even just gold or shiny yellow polish/silver or acrylic paint will work as well.

For the Santa face, I again used the red for the hat and just did the tips of my nail again trying to make it as straight as possible.  (using tape may work for some )  I did it free hand.  Peach Acrylic for the face and I made it a little wavy for the bottom of the face to give it an effect for the Santa beard.  Black dots for the eyes and Pink for the nose.  All finished !!   You will need a lot of drying time in between coats for this design.

Try it and Enjoy.  Then let me know how you did.

Leave a comment

Christmas Lights

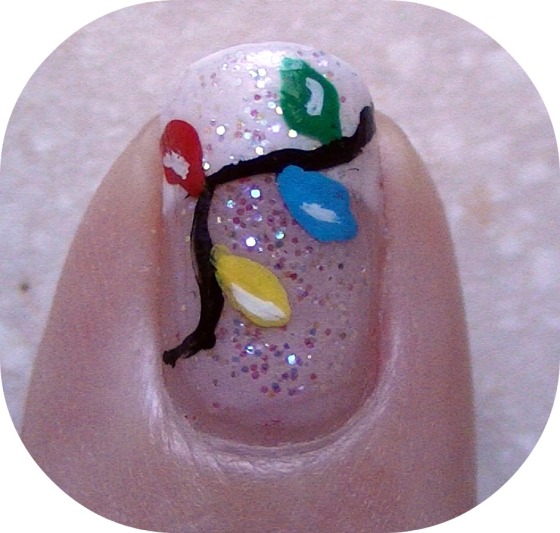
Christmas lights can be done in so many ways, I had the base of French manicure and you can see my “how to” for that here:  This design can be done without it if you desire.  Looks just as pretty even a sliver tips look great too.   Here is what I used:

Nail Art Striper – Black

Sally Hansen Xtreme wear – Disco Ball

Acrylic paints – Red, Yellow, Green, Blue and White

I started with the sparkle as I wanted the lights to be on top of that and I did two coats of it.  Next, was the black wire for the lights having it range in wavy lines was best.  If you don’t have nail polish stripers then any black polish will work with your own striper brush or even easier is using black acrylic paint here too.  I started with yellow lights on all my nails one per nail, following through for each color.  For the bigger nails/fingers I after put in a second color of choice to fill it up better.   Once the acrylic paint is dry I added a little high-light of white for an effect on the tips of the lights.   Try this easy design out.  Let me see how you did. 

You can also, check out: Cute Polish her site is amazing and see how I get the inspiration to do this design.

Leave a comment

Candy Canes

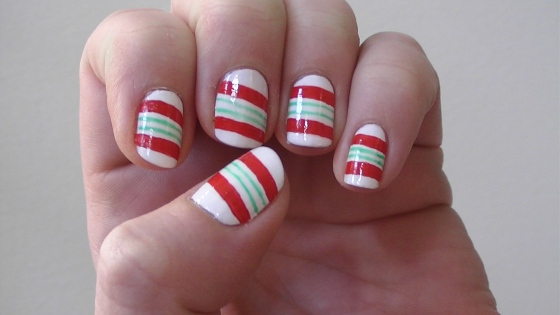
3 Weeks until Christmas that means I have three Christmas designs to do before the big day.  This is number 1.  Candy Canes !!  I was gonna tape this polish up for the perfect side stripe and now wish I listened to myself.  Anyhow, I didn’t.  So, free hand it is.  How do you think they look?  Eh?  I can do better.  But, happy I did them and boy they look cute.  

Here are the polishes and items I used :

Base Coat and Top Coat – OPI Top Coat

Base Polish – Essie 008 White

Liquitex Acrylic – Cadmium Red

Nail Star – Bright Green 

Leave a comment

Half Moon Nails

Half Moon Nails.  This design was first brought in during the 1940’s fashion.  As women and designers started to match nail polish to their clothes and accessories.  I first saw this in 2010 Paris Fashion Magazine and not long after, all over the net.  So, I tried to do it myself and for those that have tried it, it takes some practice. 

I used paper reinforcements from any stationery store.  ( walmart has them too)  I tried using tape and surgical tape as well.  They all work just fine.   Although, the transfers are already cut to the perfect circle and no cutting required. 

 The best way to get this design perfect is to take your time in placing the stickers on just perfect.  Lining up each nail for the same amount of space for the other colour all the way though to each nail bed.  Next, any two colors work.  I choose a classic black and white for my first time.  I have seen the same color one in matte and the other in gloss.  That looks great as well !! 

Second tip is make sure your polish is dry before and after you apply the reinforcements/tape.   As you’re not really wanting to redo this over again.  My polish did bleed a little and I had to do some touch ups as you can see.  I will be doing this look a lot I really like it.  If your quite good with the steady hand some have done this look  free hand.  I on “the other hand”  can’t seem to get it looking as good as the stickers. 

I used OPI Alpine Snow and OPI Black Onyx for this look. 


Leave a comment

Newspaper Nails

OH, Boy this is fun and looks really cool.  If you haven’t tried it I suggest you do it’s so simple to do.  I don’t have the photo but, I did it on my toes as well.  I am now looking for other newspaper print in different languages, perhaps cartoon nails, crossword nails.  So, stay tuned and check out my latest.

This base color polish was light grey by sallyhansen.com I used Insta -Dri.  This must be completely dry before you add-on the newspaper.  I used rubbing alcohol,  some use water.  First, cut all 10 pieces for your nails and about the same size as your nail beds.   1 inch by 1 inch or so.  Dip your paper one at a time into the alcohol and place onto your nail.  Don’t move it as it will smudge, press hard for a few seconds and then remove slowly.  Go to the next nail.  I did all my left hand first then, once dried, I painted two coats of top coat.  Once that was dry I did my right hand with newspaper print.  You will need to sent the print with top coat as it will come off and ruin the design.   As you can see it smudges easily.

ENJOY !!!


Leave a comment

Halloween Nails

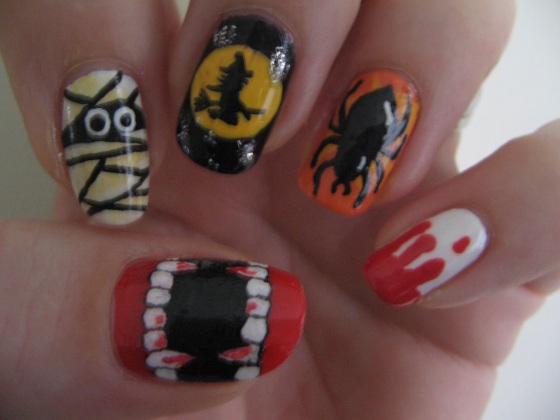
Halloween Nails !!!  This was fun, ya I should have taken a photo of each nail individually but, I missed the boat on that.  Enjoy.


Golden Acrylics: Carbon Black and Titan Buff others are yellow, orange and red.  Nail Art Pen in Silver.  OPI – In My Back Pocket and Onyx Black.  Essie 008 White 

Here I use:

  • Cat Eye’s : OPI – Onyx Black for the base and acrylic green for the eyes
  • Skull: Essie – 008 White and OPI – Onyx Black
  • Frankenstine: China Glaze – Tree Hugger and OPI – black and Essie white
  • Eye Ball: Essie – 008 white, acrylic red paint, Essie – Mesmerize and OPI Onyx Black
  • Ghost: Essie – Mesmerize, Essie white and OPI black
Leave a comment

West Side Story

I went to the theater and saw the musical “West Side Story”  it was FAB.  So, I had to do my nails for it.  My thumb nail is actually an image I found on the web and trimmed it to the size of my nail.  Putting first one coat of base coat then putting on the cut-out then two more coast on top of that to make it stick.  It needs to be sealed well or, as soon as, you have a shower or wash the dishes it will come off.

For the other nails I used Sinful Colors Midnight blue for the background and then Fiji purple for the background bottom to give it more depth.  Once it was dry, I use Revlon Sparkle to give it a night look (starry night)  I really liked this Revlon polish as it has a vanilla smell not that yucky lacquer smell.

I really wait until all is nice and dry, even the next day I will sometimes start the detail acrylic painting on my nails.  I really need to make sure that the enamel is completely dry before starting.  I use Golden Carbon Black for the buildings and I use a Cadminum Yellow for the windows.  Do different sizes for the buildings and windows makes it more believable.